Monday, February 28, 2011

Day 59: Not Granny's Hangers

 Here is the finished pouch from my first knit test swatch.  It is difficult to get snaps to fit securely in a loosely knit texture.  Lesson learned.
 This was a metal belt I bought more than 10 years ago in Brazil and I can no longer buckle it (not that I ever actually wore it to begin with, I just really liked the idea of being able to wear it), so I took all of the links apart and now I have several stunning options which are all better than a belt I never wear.


 I used one for a nice button at the top of my finished shrug and I far prefer it to the pink pin I used in yesterday's blog picture.

I linked this idea to a craft link party at:


As for the "Not Granny's Hangers" bit....I don't know about you folks, but my granny (from Oklahoma) had yarn covered things ALL OVER her house!  Tissue boxes, spare toilet paper rolls, coasters, hangers, you name it and it had yarn on it and often sported a little yarn pom-pom as well.  I always thought it was a little quirky and unique to my granny (and her mom as well, great grandma White) and I just saw it as part of their warm and fuzzy charm!  Little did I know that yarn covered hangers actually keep clothes from slipping off of the hangers (HELLO!!!!!).  So I decided to pay homage to grannies everywhere that know that everything is just better with a yarn covering!  Here is my hanger to match the shrugs I just made.  I made each with leftover yarn from the projects, and I put the tags from the yarn itself on the hangers so I know how much yarn I used, how much money went into it, care instructions, brand/dye lot/needles used/pattern used in case I want to know later beyond what my memory will allow.  I also figured it would be nice that the yarn matched the sweater so that all info would be sure to stay coordinated with the garment.  I wouldn't want to do something silly like wash a cool shrug improperly and render it a doll garment just because I forgot the original care instructions.  Plus, in many cases, the tags used for yarns are as unique and interesting as the yarns themselves.  If I were to then sell my wears, I would know what the raw product investment was....helpful info I think!  I would also have all the info I need if my BFF comes over and says that she is just crazy to have one just like mine, only purple....I would surely have the info to give her so she can MAKE HER OWN =)

The kids were both healthy enough to go to school today, so I set out to run errands today since I felt like I have been on lock down for several days in a row.  I dropped the kids off at school, went to the bank, I dropped off stuff at Goodwill for donation, I went inside to see if anything there inspired me to craft with it, and then I grabbed coffee.  By 10:00 I was completely wiped, and ready/willing to go home.  I watched a movie (very very sad, but good, Hillary Swank is my idol), crafted in bed, and napped for a very very long time.  It was nice.

Sunday, February 27, 2011

Day 58: SHRUG, and just my size!


I finished off my shrug today.  There are a few errors in it for sure, and I am not committed to the closure at all.  I actually might prefer to have a ribbon running through the bottom area and do a wrap around tie thing.....we shall see.  That is why I like pins over buttons.  If I want to wear it closed at the neck (like the picture yesterday of my daughter) I just move the pin to the top.  Things I don't like about this shrug that I will change next time around.....I added length on the sleeves from the original pattern which I do like, but I hadn't intended on that bubbly edge on the sleeves.  I had intended to alternate knit and pearl rows, but forgot and did strait knit on the inside after the rest of the shrug is mostly visible on the knit side out.  I would also decrease some stitches on the arm band so that it fits more snugly.  All in all, I still like it.

Behind is pictured groupings of frames (not made today) that I like to do.  I covered two mats with brown fabric and I stamped with brown ink on two more mats to bring these into a grouping.  I like to use same colors in groupings and then bind multiple frames together.  It saves on each and every frame wiggling around and not being straight.

I linked these frame groupings to a gallery wall idea party at Inspired Room. Check it out!
This other picture is of the larger grouping I made for my stairs.  I took several floating frames, all black, and used a stamp with ink designed for glass and non-porous surfaces to bring together several family photos.  The central picture is one taken at our wedding with the most of both sides of the families in one place at one time.  I used the Cricut to cut out the four family names on adhesive plastic, and added that to the floating frame.  After all of that decoration, I bound the frames together in a grouping with brackets (bought at home depot).  The only downside to this set-up is that it is impossible to hang alone, but once it is hung, it is done!  I can update pictures for sure, but again, a two person job.  Thought I would share these pictures to relate to the fabric photo frame grouping I blogged a couple of days back.  This is much the same thing.

Also, thanks to all who are reading and commenting and encouraging me in my creative voice.  I think we can isolate ourselves in our own worlds so easily, and it is nice to know that I am writing and reading and thinking and creating for more than just myself.....not that creation for myself isn't enough....if you are reading, I am sure you know what I mean.  I also hit my 2,000 hit marker last night, so I am pumped to be keeping pace with my own personal goal of 1,000 hits per month.

Saturday, February 26, 2011

Day 57: Shrug, who shrunk my shrug? Shrug....nobody knows....sad.

Okay, now two days ago I was blogging about running out of yarn mid-shrug, and the chaos that ensued to be sure that I procured enough yarn to finish my project.  Now, before I am praised for my BEAUTIFULLY KNITTED CHILD'S SWEATER, remember that this was an ADULT SIZED (extra adult at that) garment to the T on the pattern.  Well, maybe not "to the T" in retrospect as I paid absolutely NO attention to the size needles , guage or weight or however yarn is actually measured, nor did I make sure that 8 stitches was equal to 4 inches.  This is what my baking friends would call a fallen cheese cake from not adhering to every ounce of the ingredient list...*side note, Sylvia and I went to make cookies today spontaneously and found that we have NO sugar and not enough flour.  My friend "How-Bout-Them-Bars-Amanda" would be absolutely SHOCKED, but then again, she neither believes in facebook nor frequents my blog, so she really isn't likely to know unless I confess it as I am likely to do anyway....hmmmm....  end side note, sorry*....I have remedied my short comings for a second shrug for which I have PLENTY of yarn!  I am assured to be more than mid-shrug by the end of the netflix movie with hubby tonight.  Now all of those reality confessions aside, doesn't Sylvia look proud of her new sweater!  She picked out the pin from my stash made of glass tiles, paper, and diamond glaze herself.  She is a pink girl, despite my best efforts!


Just so you don't think that I only make things for my Sylvia, here is a "Private" space curtain I made to hang under my son's loft bed.  It is the logo of my hubby's favorite soccer team (Brazilian, yes) on the colors of the Brazilian yellow and green national flag.  I can't really claim much credit as I only sewed the curtain sleeve on the top of the banner sent by my Mother-in-Law.  Felix is pretty pumped about it and happily posed for a photo tonight to show it off.  I used the cable system curtain hangers that I got at IKEA.  I first used this system to deal with making curtains that go inside my bay window so that I wouldn't lose the entire seating area when the curtains were closed and the insulation part of the curtains would be as close to our freezing cold Minnesota winter windows as possible.

I linked up to some blog parties for the first time this week, and I am shocked at how much it has changed my readership stats!  Thanks to Miranda at www.justdrinkacoke.blogspot.com and Rachel at www.bubblynaturecreations.com for hosting link parties!  I really need to learn how to do that!  Wouldn't it be cool to have a creativity themed project that all of us artists/crafters/bloggers can make a project together and share the differing end products?   Chappy, if you are reading my blog, I will be calling you as I suspect you could teach me a lot about this sort of thing!

Friday, February 25, 2011

Day 56: Cards and Stamping


I went to a little crafting party with my aunties and grandma tonight....a much needed get-a-way from sick kiddos and being in the house nearly non-stop for a week!  It was a "Stamp It Up" thing and the hostess had stations set up with demo-cards at each table, and all I had to do was take the materials and make cards.  I didn't have to cut up paper, or coordinate things or anything!  Since most of my crafting is very "me" I appreciated the break where I could just monkey within very set parameters.  I made 15 cards in two hours, and chatted with family too!  Not the best blogging material, but my day with sick kiddos wasn't that great either!  Better luck on all fronts tomorrow.

Thursday, February 24, 2011

Day 55: KNIT!!!!! and crochet

To pouch or not to pouch, that is the question!
Please oh please don't leave me hangin' mid-shrug
I took my first knitting class last night, and started out that session watching the most diverse cross-section of culture (male/female/young/old/grunge/supersqueekycleenanddoneup) in one area while I crocheted just so I wouldn't be distracted from this interesting event by my yarn project.  After a while, I decided that I was there to learn something new and get out of my comfort zone, so out came the knitting needles.  I do know HOW to knit without actually having any idea what I am doing at all.  I now know for sure how to knit and how to purl, and thanks to uTube today, I can now increase showing a bar and blind increase....so that is cool.  I bought some cool yarn and some big honkin' needles to work with, and away I went on a learning swatch pictured below in the gray/blue yarn.  I also bought a PATTERN for a cute little shrug that the lady next to me swore was the easiest pattern on the planet (the fact that she was working with FOUR NEEDLES at once should have been a big red ball of yarn to the face.....NOT EASY for those that can't use four needles at once).  Today, I spent the bulk of my free time (still keeping in mind that I have the two kiddos home for the fourth straight day of illness....Felix puked this morning early, otherwise he would have been ON THAT BUS this morning) knitting the remainder of my swatch which no doubt will become a pouch tomorrow.  Sorry.  Didn't mean to spoil the surprise.  I then started on my *easy* pattern.  After ripping it out and doing it over several times, I understood the pattern and its abbreviations.  Once I got in my rhythm, I realized that I had run out of yarn.....MID-SHRUG.  So off to the yarn store with two sick kids following along as it really is in every one's best interest to have a mommy with plenty of yarn, and then I found out that they only had ONE SKEIN left in the color I was using, and they can get two more from the other store, but then I might be out of luck!  I can't shrug without enough YARN!  AAACK!  I also can't just move on as I am really quite proud of my first little project.  I WANT MY SHRUG!  The lovely person at the yarn store encouraged me to continue on my path, and then when I run out, we would do a lovely little stripe around the base of the shrug and the bottom of the arms....okay.  I trust in you, yarn guru!

Wednesday, February 23, 2011

Day 54: Fabric Wrapped Frames, Wool Pouches

Day 54 is getting close to my 2,000 hits mark!  I hope that I can keep up the pace even in the short month of February! I posted these fabric frames on a link party here


Bubbly Nature


I saw this project (or something similar) in a magazine for scrap crafts, and I modified it so that I could use it with the glass in it.  The version in the magazine had the glass glued to the back of the whole thing and then covered permanently with some sort of chipboard also glued down with a picture inside.  It sort of ruined the point for me as I like to have my frames with updated photos with the exception of some "classic" shots that never go out of date.  If I have glued it shut, I can't continue to use it or even re-gift it if my fabric tastes change over time.  To remedy this issue, I used glue on the back of the frame but wrapped the fabric with some slack in it so that I could squeeze in the glass (careful!!!!  I broke my first try in my lap and counted all of my fingers afterward).  I also found better success with the deeper frames.  In the photo below, you might be able to see what I mean.  The top black frame is not deep and won't work easily while the bottom one is deep.  It even had a spacer made of wood that I could shove down first before putting the glass in.  There is still some room for photo and then a modified chipboard (cut to size so that it will fit in tightly, but not glued down).  I searched through my abandoned frames to find three that were all deep (I like to work in groups of three of five....it is an artistic thing....for the garden too....why though, I really don't know).  I then used scraps from some pillows I made a while back for our couch in the living room.  I can then hang this grouping together and it will relate to the other stuff in my room.  Pretty good project for the day.  I used up lots of fabric scraps, some fiber scraps, some abandoned frames, and I only broke one piece of glass on myself!
Two frames of differing depths
Photo shows the wooden insert for this deeper frame


 Here is today's pouch with some pictures of the details on it.  The ribbon really is the best part of it....and THE BUTTON is cool!  Otherwise, it is just same ol' business.

Tuesday, February 22, 2011

Day 53: Soap Reveal and Wool Pouches Continued

Here is a recent photo of my Robert and me at a gathering for a friend's birthday.  Sometimes happiness just surprises me.  We look so happy here (not that we aren't usually....I just am not LOOKING at us since we are us if that makes any sense at all)!  It made me smile, so I just had to share!


 Here is the day's produce in the line of wool pouch creations.  I knitted (poorly, but knitted all the same) the little section that then became a part of the closure decoration.  I think I am addicted to the ease of snaps....if only they were more interesting!  Maybe I need to work on embellishing my snaps!


Here is a relatively fresh batch of soap that I used my "N" lyno stamp to decorate the surface.  I think this batch was made with lemon grass essential oils and egg shells finely ground for exfoliation.  I took a veggie peeler to all of the edges today just to give a more refined look, and I think the finished look is worth the three seconds it took me to do the entire batch.  This one should be shower ready by mid-March.

Tomorrow it looks like we will all be home again with fevers etc.  Felix might escape but I will make the final ruling tonight when I take his un-medicated temp before bedtime.  Sylvia is home for sure.....

Monday, February 21, 2011

Day 52: Red Fiber Flowers


I got "snappy" today, and I love the color contrast between the green wool and the red vibers.  I am so ready for SPRING (says the woman living in Minnesota underneath 15+ inches of fresh snow)!  I found myself looking through the iPad today to find garden pictures, but cyber gardening doesn't really cut it.  I know it is almost March, but really folks, I have had it with this weather!  Both kids were home today for Pres' Day, and about 4:00 this afternoon, I realized that my extra snuggly kids both had 100+ fevers, so they will be home tomorrow for sure too.  Bah.

Sunday, February 20, 2011

Day 51: Crochet and Crochet


 I took my crochet swatch and wove it through the last wool pouch of the black fabric.  I like it in contrast to the smoother black.  I will do more pouches over the next week for sure.  I love these textile samples.  The more, the merrier!  Perhaps innovation will be more in play after my stash of pretty hand-dyed wools and yummy fibers is used up.

Saturday, February 19, 2011

Day 50: Crochet

Today I sat at Orchestra Hall listening to All-State Band and Orchestra concerts and crocheting with this lovely yarn.  I don't know what I am going to do with it yet, but sometimes, crochet is just crochet.

Friday, February 18, 2011

Day 49: Wool Pouches with COOLNESS!

Here are a couple of pouches I made from the wool stash and the fibers bought at The Yarn Garage.  I LOVE THESE!  I WILL MAKE LOTS AND LOTS AND LOTS!

Also, I made my mystery deadline for a contest sponsored by Martha Stewart seeking "ReMARTHAble" talents.  I just submitted my application.  I am now hoping to be a finalist, be featured on the Martha Stewart Show, and win a BMW X3....whatever that is....I know my fabrics, but I don't know my cars!  I just want to go on the show!  Keep your fingers crossed.  I think it would be a blast!  Do you think I am "ReMARTHAble"?  Some days I think so, other days I am far from it!

Thursday, February 17, 2011

Day 48: Fiber Heaven

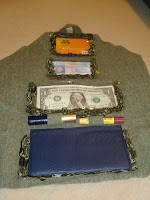
I had a great creative day.  I found a replacement stash of hand dyed wool to work with (thanks to Eagle Creek Quilt Shop in Shakopee, MN) and I then went to The Yarn Garage in Rosemount, MN which was AMAZING.  I found a lovely selection of unique fibers to work with and I absolutely fell in love with texture and materials this afternoon.  I have been working on little bags, zippered/folded/buttoned/fabric/crochet/knitt/embellished.  This is my product for the day.  All of the details are hand sewn ruffles from a skein of ribbon type "yarn."  I have clear plastic pockets for my check book, a pen or make-up, cash, license/insurance cards, and the top one is most available for the debit/cash card.

 Then the sides fold over and the whole thing folds up and buttons closed.  The wool doesn't need finishing on the edges since it is felted already.  This was a super fun project!


I used the wool and ribbon sample from yesterday and I wrapped it around a used ribbon spool.  There were two ribbon spools (one thick and one thin) and the thin spool fit tightly inside the thick spool to make a pretty cool little container.  I added some paper on the inside for an additional "surprise" element.  I will save all of my used ribbon spools from now on for making these cute little containers.

Below is a picture of the yummy yarn-type fibers from The Yarn Garage.  Feel free to drool!  I love these textures!

Wednesday, February 16, 2011

Day 47: I don't know what to call it, but I like the texture of it

I was working ribbon through plastic and I sort of stumbled across this little braid pattern.  I took the ribbon off of the plastic and added it to this spare strip of felted wool fabric.  Since it was felted, I just cut through it with an exacto knife and then added the central ribbon.  Then the looped ribbon was woven in and out of the up sections of the center ribbon.  I pinned the end down with a glass pin I made a while back.  I could roll up my little sticks of travel make-up (if I actually traveled with make-up....) and just tie up the roll.  This isn't quite where I wanted to end today, but I figured I should post the process sometimes too.  I have a concert to go to tonight, so no more crafting revisions today.  This is a technique I will do more with in the future....for sure.

Tuesday, February 15, 2011

Day 46: Pencil/Pen/Crochet/Knitt Needle Holder Thingy

I made a holder for my pen/pencil/craft hooks to stick in my purse so that I won't have a spare pencil point or un-capped pen running around free in my purse of choice.  I used the same file folder construction with magnet closure as I have used for past journal covers.  I cut out my initials in contrasting color with my beloved Cricut, and I love the end product.  My favorite part of crafts is when you own an idea that you borrowed from another crafter/artist, but you have done it so much that the variations come about quite naturally.  Before long, the line of thoughts dumps you out so far from the beginning that it feels like a completely new product.  This isn't a departure very far from the notebook covers. but I didn't have to think very hard about the construction and the first one made was a product I was happy with.

In this one, I just wanted to carry a nice pen that I liked to use for writing (letters, journals, archival quality stuff), a standard pencil that I tend to use in my sketch books for jotting down ideas, and then my two go-two yarn/fiber crafting needles (I WILL LEARN HOW TO USED THAT STINKING ROUNDED KNITTING THING IF IT KILLS ME, and my old friend mile-a-minute crochet hook).  This way, I just grab a skein of yarn and I can entertain myself anywhere until the last inch of yarn runs out.....a definite "must have" for the hard-to-sit-still personality type of mine.  Two more crafting days until the deadline......TWO MORE!

Monday, February 14, 2011

Day 45: Clear Plastic Purse for ME!


Here is my first try at the plastic purse idea....and I am pretty pleased with it, if I do say so myself!  I did my first version with black as everything goes with black and I wear black much of the time anyway.  I have some sketches of different styles, but this one really fits me well.  The backpack will balance the weight between my shoulders, and I can't possibly carry more than I am "allowed."  I have a more filled out idea that I will reveal after my deadline on Friday.  Stay tuned!  Oh, and don't be distracted by its somewhat lacy stitching.  I looks much less tawdry with stuff inside =)

Sunday, February 13, 2011

Day 44: Beaded Heart Bobby-Pins, and one step further toward liking the product


 Sylvia decided TODAY that she needed to make something to wear special for Valentine's Day at school tomorrow.  I left for a thing at a girlfriend's house from 1-4 ish, and suggested strongly that she finish her homework while I was gone so that we would have time when I got home to make something.  When I returned later than originally planned, she confessed that she hadn't finished her homework as she was "distracted"....and we then spent the next nearly two hours getting it done....with additional mother/daughter drama to be sure.  After dinner, we then made these little beauties for her hair.  Crisis avoided for one more holiday!


Here is stab number 2 at making the project from yesterday work more aesthetically.
 I used fabric paint (red, white, silver, and black) to cover up the stitching on the back sides of each fabric page, and to detail and frame each photo page.  I like it.  It just adds another layer, and it helps the over-all effect of these random glimpses into different parts of my family life.  I have these silver ribbons tied in different spots around the frame of each page which ultimately will function as page tabs of sorts.  Stay tuned for how that finally works out.


This picture shows that the ribbons are actually attaching a clear plastic pocket (all from scraps too) on the back side of each photo page.  I plan to use it as a card tracker....you know, to keep all of those random cards that we all have in our purses (or wallets)....I have gift cards to restaurants and coffee shops from former students.  I have frequent shopper cards for discounts at my favorite shots (Quilt Cove in Eagan, Bead Monkey, and the like) and also business cards of cool random artists that I collect over time.  I will probably also end up with a medical tab too for appointment cards and phone number cards for the variety of doctors I also frequent.  I will make efforts to label each divider with something that makes sense, and then just enjoy my little picture pouch in my purse.  I have several more pages that need added ribbon and plastic pockets, so this project is still evolving.  I am really missing my fiber friend Kristin as she is still in Africa doing good in the world....while I sit here without another artist's eye to help me evaluate.  So, internet friends....I need your honest feedback on these projects.  Give it to me straight, but don't make me cry on Valentine's Day ; )

Saturday, February 12, 2011

Day 43: Not as I imagined it, but getting it "not quite right" is one step closer to being "spot on!"

 Okay, I won't explain the idea just yet as I want to get a product that I am happy with....this is where I ended with tonight after about 4 hours of work on it today.  I copied these pictures onto fabric paper, then ironed that onto fusible webbing, then ironed that onto black fabric folded as if it were a booklet, and the STICHED with my irritable sewing machine......I will likely still work with this one more tomorrow to see if I can work out a few more kinks before I actually get a product I like.  This one is really "loose" and I am a lot more refined than this.  Threads everywhere although nothing is really in danger of unraveling.  I do like the pictures though.  Maybe I can learn to like it with more work and layering, but tonight I am disgusted with the end product of so much time today.  I have a deadline five days from now, and I got absolutely NO CLOSER today.  Tomorrow must be a more successful day, although I did read somewhere that Einstein claims to have failed 999 times for every one success.  I dare say that my batting average is higher even if the genius isn't quite as intense =)

Friday, February 11, 2011

Day 42: Paper Bead Stretchy Bracelets, Bag for Magic Beans


 Okay, I admit that the top picture is odd.  Sylvia took it when I was mid-bag.  Now that I am downloading pictures for the blog, I realize the angle, and frankly it looks as though I am preparing to give birth.  I spread the yarn out around my knees to keep it from getting knotted, and I am in bed a fair amount of the day resting my back, and honestly, to get anything made at all feels a little like pushing through birth pains as well.....less messy, but painful none the less.  This is my second little baggie in a series using textiles that I love.  My son, Felix, says it looks like it would hold MAGIC BEANS when I had just intended it to hang on to my loose change.  I attached a little "label" with three German coins from being abroad in a summer music program just after high school.  I shined them up in my tumbler first, and now they jangle on my magic bean bag.....quite a place of honor I think!
 I finally strung some of my expanding paper bead collection onto strands of stretchy string.  They amuse me to no end with their textures and colors and simplicity.  I think I will make tons and tons.  Everyone on my future gift lists will likely get soap, paper bead bracelets, and journals.....I feel sorry for the manly types on my gift list.  I simply must develop a more masculine hobby at some point.  Maybe turning wood bowls?  Maybe in my 40s.  Today was a pretty productive day, despite how useless I felt.  Maybe I will birth more bags tomorrow.....only time will tell.